SCA agent-based scan quickstart
This quickstart guides you through running a Veracode SCA agent-based scan from a command prompt and reviewing the results in the Veracode Platform.
You use Software Composition Analysis (SCA) to:
- Identify security vulnerabilities in open-source libraries.
- Assess the risk level of open-source licenses.
- Fix vulnerabilities efficiently.
- Determine which licenses require updates for compliance.
To run your first SCA scan, complete the following tasks:
- Obtain a Veracode account with the required permissions.
- Ensure access to the demo application for your first SCA scan.
- Sign in to the Veracode Platform.
- Use the Veracode Platform to create a workspace SCA agent.
- Run your first SCA scan at a command prompt and review the results.
- Use the Veracode Platform to review the results.
Video: SCA agent-based scan quickstart
Obtain a Veracode account
- To access the Veracode Platform, you must have a Veracode human user account.
- To run an SCA agent-based scan, your account must have an SCA subscription.
- To configure scans, submit scans, and review scan results, your account must have the Workspace Administrator or Workspace Editor, Security Lead, and Submitter roles.
Contact your Veracode Administrator to verify your account has the required roles. If you are a Veracode Administrator, your account likely has the required roles. If it does not, you can add roles to your account in the Veracode Platform.
Access the repo for the demo application
To complete this quickstart, confirm access to the repo veracode/example-ruby. Cloning, downloading, or compiling is not required.
In this demo application, several libraries have vulnerabilities and several licenses are at unsafe versions. You will see these vulnerabilities and at-risk licenses in the scan results.
Sign in to the Veracode Platform
Sign in to the Veracode Platform using the domain for your region. Each region has a unique URL. This quickstart uses the Commercial Region domain: analysiscenter.veracode.com. Your account might be in a different domain, such as the European Region: analysiscenter.veracode.eu
- If you have a new Veracode account, you received a welcome email that provides a link for activating your account in the Veracode Platform. If you did not receive the welcome email, contact your Veracode Administrator.
- If you have an active Veracode account, you can sign in to the Veracode Platform using the domain for your region. If your organization uses a Single Sign-On (SSO) portal such as Okta, you can also access the Veracode Platform with SSO.
Create a workspace SCA agent
An SCA workspace contains one or more projects. A project is a local or remote Git repo that contains your application source code. For this quickstart, the project is the demo application and the workspace is the default called My Workspace, which is included with your SCA subscription.
You install and activate an SCA agent on your local system using My Workspace. The SCA agent is a small script you run from a command prompt.
Ensure your organization has given you permission to install software on your local system.
The SCA agent will:
- Build the application.
- Create a dependency graph of all libraries and their dependencies.
- Scan your application and communicate with Veracode SCA to detect vulnerabilities and at-risk licenses.
- Display the results in your command console and upload the results to My Workspace in the Veracode Platform.
Before you begin:
Ensure your system meets the SCA agent requirements
To complete this task:
-
On the Platform Home page, select Scans & Analysis > Software Composition Analysis.
-
On the Software Composition Analysis page, select the Agent-Based Scan tab.
-
In the WORKSPACE LIST table, select My Workspace.
-
From the left pane, under Manage Workspace, select Agents.
-
Under Set Up Scanner, select the blue box for your operating system: OS X, LINUX, or WINDOWS.
If this is not your first time creating an agent, you see the Agents table, rather than the Set Up Scanner page. Above the Agents table, select Actions > Create.
The page changes to a list of commands for setting up the SCA agent. To install the agent with a specific tool installed on your system, select the subtab for that tool. For example, if you select WINDOWS, you see subtabs for chocolatey and PowerShell.
-
At the command prompt, run the commands that you see in the Veracode Platform to install and activate the SCA agent for your operating system.
noteFor this quickstart, do not run the command that starts the scan.
-
To ensure you installed the SCA agent successfully, run the following command:
srcclr testThe command output shows the agent version and details about your operating system, including the installed package managers. If you see an error, try re-installing the agent or generate a new activation token for your agent in the Veracode Platform.
Run your first SCA scan and review the results
Run an SCA agent-based scan and view the results in your command console.
To complete this task:
-
At the command prompt, run the following command to scan the demo application with the
--update-advisoroption.srcclr scan --update-advisor --url https://github.com/veracode/example-rubyThe Update Advisor lists the safe versions of libraries that Veracode recommends for your project. The
--urloption specifies the URL for a remote Git repo. To scan a local repo, replace--urlwith the project path, e.g.,/my/project. Refer to the complete list of command options.The results appear in your command console. If you see a warning that the agent is unable to clean up the scan directory, you can delete the scan directory and retry your command.
-
Review the following information in the results.
Results Summary
The top sections of the results show a general summary of the scan. Because the demo application is Ruby, the scan used the Gem package manager. You can quickly see the number of libraries you scanned, including direct and transitive, and the number of libraries with vulnerabilities. Under the Vulnerable Methods section, the scan detected a library with a vulnerable method, which is a high-risk vulnerability. When prioritizing which vulnerabilities to fix, Veracode strongly recommends that you fix vulnerable methods first.
Summary Report
Scan ID                                        8f106664-3e2f-499a-bbf5-40939d55cf0a
Scan Date & Time                               Jan 04 2023 04:41PM EST
Account type                                   ENTERPRISE
Scan engine                                    3.8.17 (latest 3.8.17)
Analysis time                                  3 seconds
User                                           verauser
Project                                        https://github.com/veracode/example-ruby
Package Manager(s)                             Gem

Open-Source Libraries
Total Libraries                                127
Direct Libraries                               18
Transitive Libraries                           111
Vulnerable Libraries                           34
Third Party Code                               99.9%

Vulnerable Methods
1 vulnerable method can be reached via the code's call graph

Call Source                                    Method Name               Library
ApplicationHelper [line 2]                     SSL.redirect_to_https     rack-ssl : 1.0.0

Security
With Vulnerable Methods                        1
High Risk Vulnerabilities                      15
Medium Risk Vulnerabilities                    85
Low Risk Vulnerabilities                       4
Vulnerabilities
The Vulnerabilities sections list all vulnerabilities, sorted by risk level, that the scan found for the open-source libraries in your project.
Public Datarefers to vulnerabilities with a Common Vulnerabilities and Exposures (CVE) ID from the National Vulnerability Database (NVD).Premium Datarefers to vulnerabilities that do not yet have a CVE ID from the NVD, but Veracode research has determined that they are potential risks, added them to the Veracode Vulnerability Database, and assigned each one a Veracode ID.Vulnerabilities - Public Data
CVE-2019-5421 High Risk Time-of-check To Time-of-Use (TOCTOU) devise 4.1.1
CVE-2016-2098 High Risk Remote Code Execution (RCE) Through Render Method actionview 4.2.5
CVE-2022-45442 High Risk Reflected File Download sinatra 1.1.4
CVE-2017-0889 High Risk Server-Side Request Forgery (SSRF) paperclip 4.2.4
CVE-2022-30123 High Risk OS Command Injection rack 1.6.4
...
Vulnerabilities - Premium Data
NO-CVE High Risk Arbitrary Command Execution When Handling Metacharacters lingq 0.3.1
NO-CVE High Risk Copy-Paste Vulnerability (CPV) Through Libxml2 nokogiri 1.6.7.2
NO-CVE High Risk Heap-Based Buffer Overflow In Libxml2 nokogiri 1.6.7.2
NO-CVE High Risk Copy-Paste Vulnerability (CPV) Through Libxml2 nokogiri 1.6.7.2
NO-CVE High Risk Remote Code Execution (RCE) nokogiri 1.6.7.2
...Licenses
The Licenses section shows the number of licenses, by category, that you scanned. In particular, your organization can use the license risk categories to prioritize which licenses they might need to change to a safe version.
Licenses
Unique Library Licenses                        13
Libraries Using GPL                            3
Libraries With High Risk License               3
Libraries With Medium Risk License             3
Libraries With Low Risk License                111
Libraries With Multiple Licenses               3
Libraries With Unassessable License            1
Libraries With Unrecognizable License          19
Issues
The Issues section lists all issues that Veracode created during the scan. Issues help you manage all security risks for a particular project.
Issues
Issue ID     Issue Type          Severity    Description                                                  Library Name & Version In Use
153301596    Vulnerability       7.8         CVE-2019-5419: Denial Of Service (DoS)                       actionpack 4.2.5
153301597    Vulnerability       5.0         CVE-2015-7581: Objects Leaked Globally                       actionpack 4.2.5
153301598    Vulnerability       5.0         CVE-2021-22904: Denial Of Service (DoS)                      actionpack 4.2.5
153301599    Vulnerability       5.0         CVE-2016-0751: Denial Of Service (DoS) Memory Consumption    actionpack 4.2.5
...
Update Advisor
The Update Advisor section provides you with a quick lookup for the safe version of a vulnerable library. The Breaking Update column indicates whether updating a library to that safe version might break your application builds.
Update Advisor
Library Name & Version         Safe Version     Breaking Update
administrate 0.1.4             0.13.0           No
turbolinks 2.5.3               2.5.4            No
devise_invitable 1.3.4         1.3.5            No
rack-ssl 1.0.0                 1.3.4            Yes
authlogic 1.4.3                3.4.5            Yes
Review example SCA scan results in the Veracode Platform
After you run an SCA agent-based scan at the command prompt, the results are also available in the Veracode Platform. The Veracode Platform provides graphical representations of the results, which you can compare to the results in your command console.
This procedure uses the default workspace My Workspace and assumes your My Workspace only contains the demo application srcclr/example-ruby. In the Veracode Platform, the pages show the results for all projects in the selected workspace. If My Workspace contains multiple projects, the scan results may not match this quickstart.
If you included the --no-upload option in your scan command, the results are not available in the Veracode Platform.
To complete this task:
-
On the Platform Home page, go to Scans & Analysis and select Software Composition Analysis.
-
On the Software Composition Analysis page, select the Agent-Based Scan tab.
-
In the WORKSPACE LIST table, select My Workspace.
-
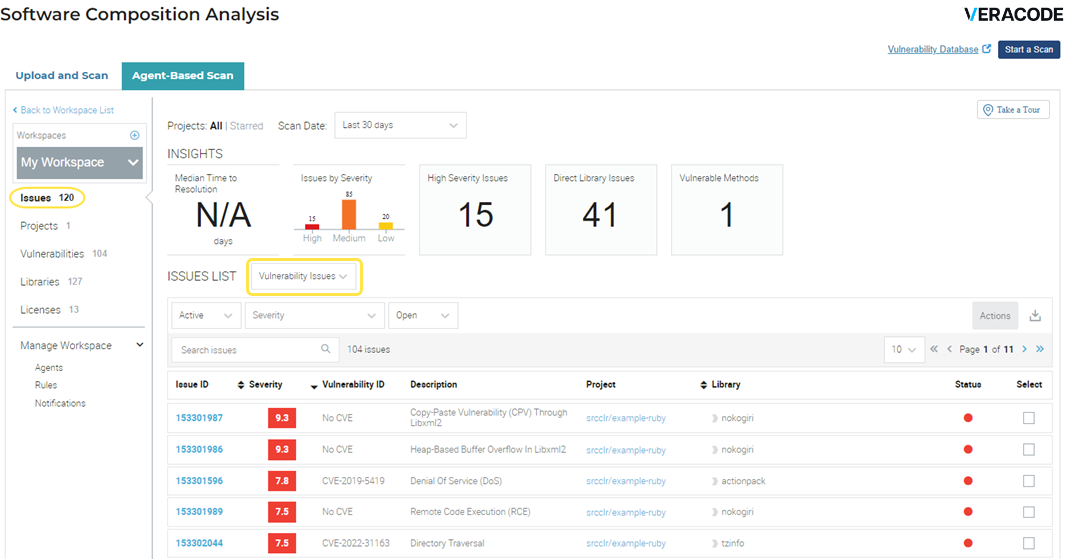
Select Issues to see a list of all issues in My Workspace.
By default, the page shows the vulnerability issues that are active (not ignored), of all severities, and open (not resolved). To view the other issue types, next to ISSUES LIST, select License Issues or Library Issues.
-
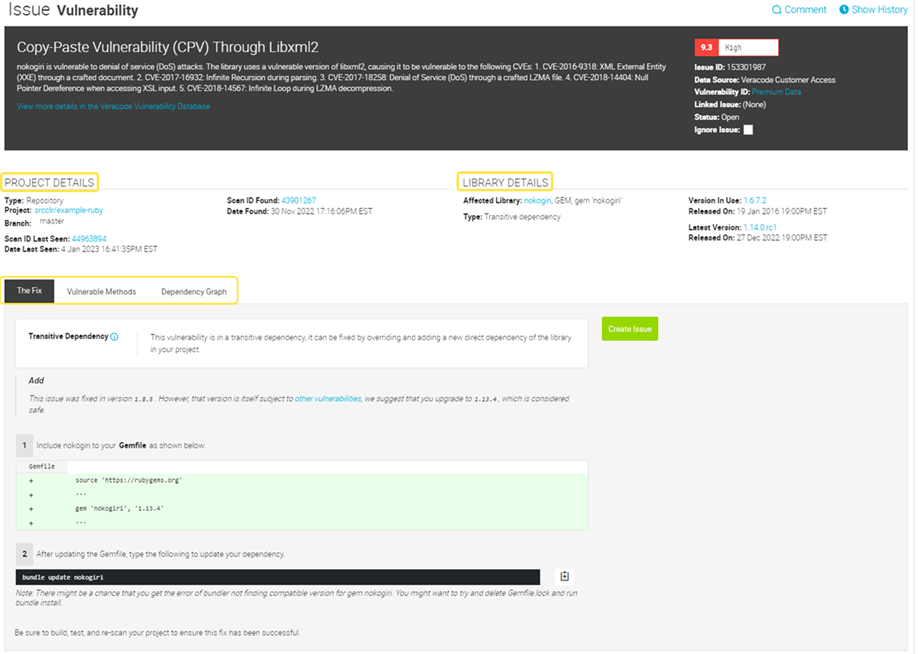
Select an issue for detailed information about the related project and the at-risk component.
In the following example, because you selected a vulnerability issue, the component is a library. The The Fix tab provides instructions for fixing the vulnerability. To see if there are vulnerable methods, select the Vulnerable Methods tab.
-
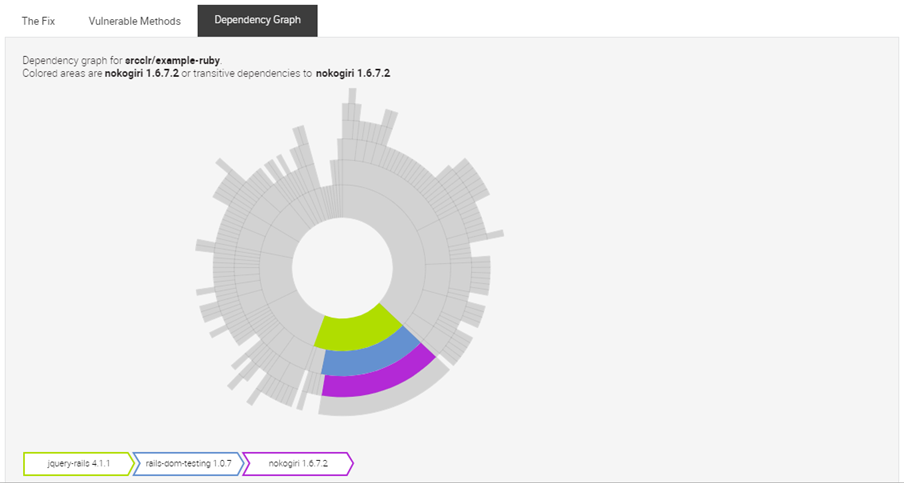
Select the Dependency Graph tab. This interactive, color-coded graph shows the relationship between the vulnerable library for the selected issue and its dependencies.
-
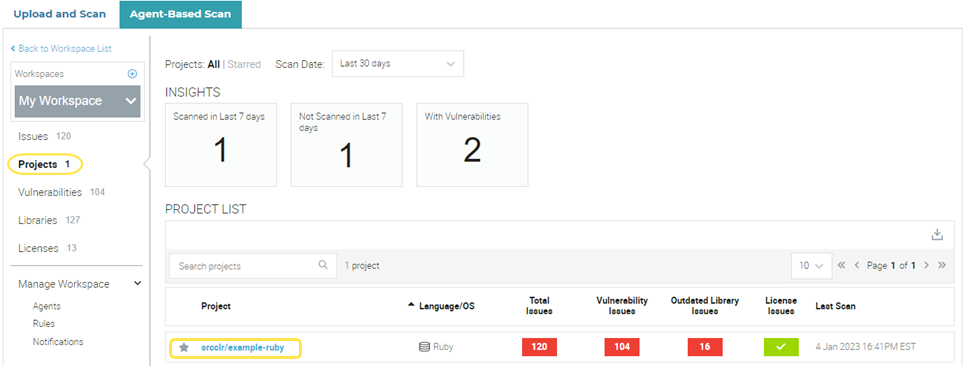
Select Projects to view all projects in My Workspace. Then, select srcclr/example-ruby.
-
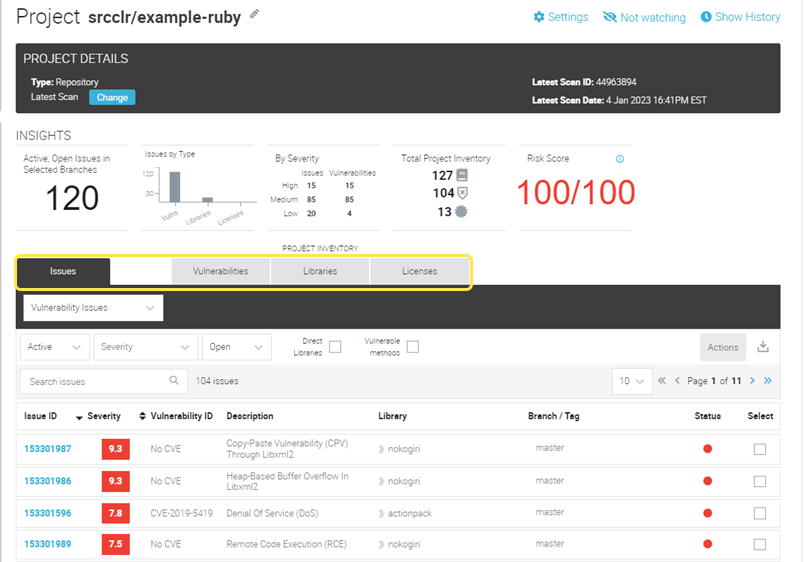
Select the tabs to view the results for the selected project.
The Project page provides you with a consolidated view of all results for the selected project.
-
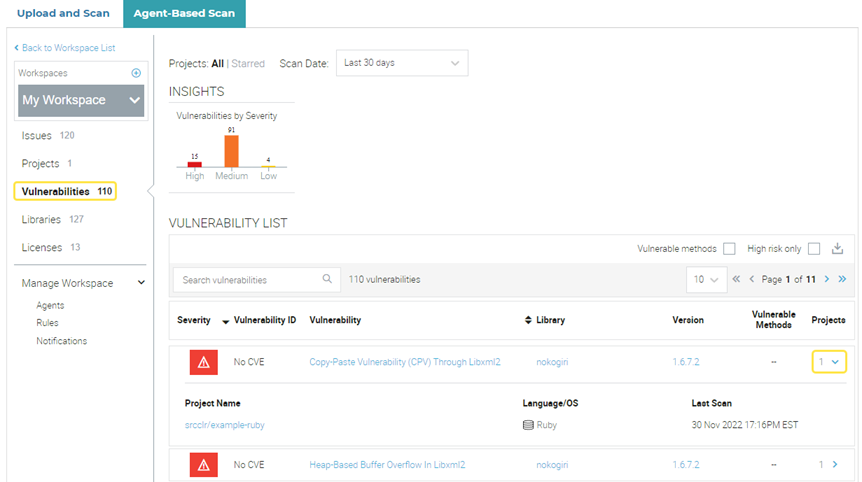
Select Vulnerabilities to view a list of all vulnerabilities in My Workspace.
To view detailed information about a vulnerability in the Veracode Vulnerability Database, select its name. To view which projects have a vulnerability, expand the project number in the Projects column.
-
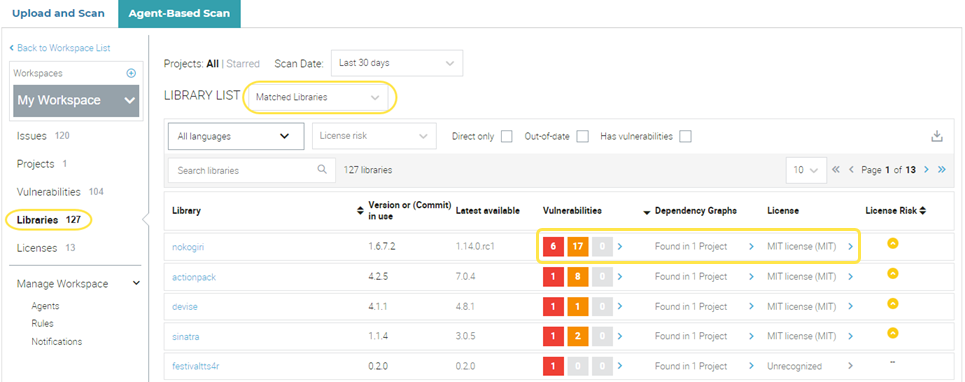
Select Libraries to view a list of libraries from all projects in My Workspace.
By default, the page shows the matched libraries that are available in the Veracode Vulnerability Database. To view the unmatched libraries, which are not in the database, select Unmatched Libraries. To view detailed information about a library in the database, select its name. In the Vulnerabilities, Dependency Graph, and Licenses columns, you can expand a cell to view the values for that library.
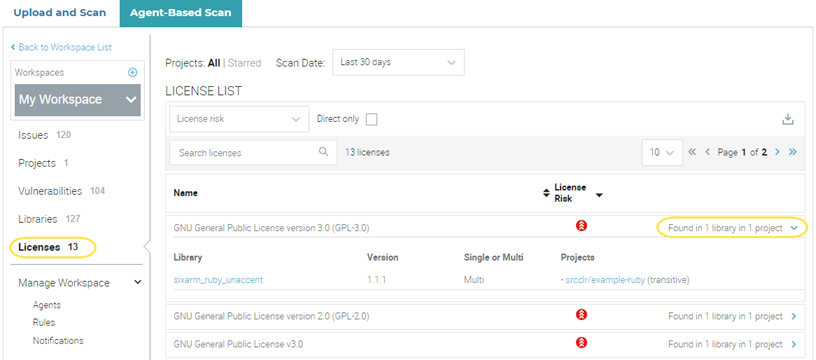
- Select Licenses to view a list of all open-source licenses in My Workspace.
To view the libraries that use that license and the projects that contain it, expand the cell in the last column. Click the library name to view details about it in the vulnerability database or select the project name to go to that project.
Next steps
- Learn to scan and fix vulnerabilities in a local Ruby project.
- Learn about finding and fixing vulnerabilities.
- Learn to create a workspace and configure workspace rules.
- Learn to link an SCA project to an application profile.
- Learn to integrate SCA agent-based scans into your continuous integration (CI) projects.